Monday, March 09, 2015

More DIY flooring fun.

We have been struggling a bit as time goes on.  This is what we have been up too in the Living Room.

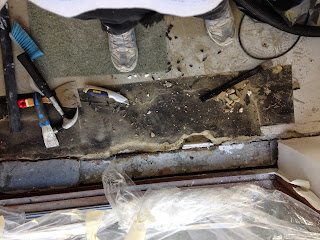
I've been pulling up the cracked concrete from our floor.  There have been a few repairs in the past that were a bit thrown together....not that ours is going to be terribly professional either!  It is only cracked in front of the windows in the front and back and a bit on the outside wall.  (This has been funny because Rich and a couple other people think when I say outside wall I mean Outside THE wall....funny.)  I took the hammer and a couple of bolsters to the floor and made a tidy job of it I think.  I realized that I needed to put a barrier up and decided the best thing was cement board, so I bought Aqua board used for tiling.  I cut it to size and used this foam adhesive to glue it in. This is what it looked like.  Not a great pics.

 This work brilliant in the front window, but not so well in the back....there was some weeks in between and the foam adhesive seized up.  Rich took a little screw driver to it....and yep you guessed it foam adhesive ALL OVER THE PLACE.  We ended up putting it in a black bag in the garden.....that was one full bag of foam!  I went to buy some more and they didn't have what I needed, so I went for a regular adhesive like sealant.....stupid!  The foam worked so well, because it didn't matter how level the area was....but the sealant did!  Plus, we didn't have a very good gun (again with the scrimping!) and Rich ended up busting a blood vessel trying get the stuff out of the gun!  I have now bought the most expensive gun Screwfix had!  It is WONDERFUL!

Then I started to pour the self-levelling compound......not as well as I thought.  I made a bit of a meal out of it.  So now what to do.  It wasn't too bad, but I forgot to prime the area again with PVA after the first layer.  It bubbled really badly because of that.  Then for some reason it buckle a bit.  So how to fix.  I've been thinking it over and decided to block off the whole area that I'm going to tile with the tile frame I was going to use anyway.  I'll glue that down with more adhesive sealant (at least this time it make sense) and I'll put the self-levelling compound the whole way.  This will help anyway, because as I was taking the old tiles up, I found more areas that weren't very level.

While I've been doing this, Rich as been painting, painting, painting......  Three layers on the inside wall at the moment.  We have also had some guys out to give us quotes on windows....and found another problem outside with the wall above the back French doors.....needs a new lintel and more mortar.....ah well.  All this fun stuff to do!

So what else have we been doing???  What Dawn and Rich...isn't the living room enough???  NO! 

Because the builders are coming back on the 16th to plaster over the Artex on the wall in the hall way and re-plaster the little bathroom downstairs,  we needed to do some re-arranging.  We recently bought a really nice Arts and Craft looking dresser for the kitchen remodel.  This has been in the hall way but we needed to get it out of there.  So this meant:
  1. Taking out a pantry cupboard and a wall cupboard.   All the stuff that stored there in boxes.
  2. Take off the counter top with microwave and etc on it put into boxes.
  3. Take up nasty lino from years back and also the carpet because it was too dirty to clean after years of not being able to get under the cupboard and dryer.
  4. Move dryer next to stove.
  5. Move frig against the wall were the cupboards were.  (Not that great a fit, can open all the doors, but not fully and condenser dryer water reservoir can't really be taken out....will have to think about that one!)
  6. Move VERY HEAVY dresser into the kitchen....couldn't have done if it was in two pieces!
  7. Now take out plates etc from the cupboards that were left up and put into dresser. 
  8. Clear out boxes etc and put SOMEWHERE! 
If nothing else, this will cure me of hoarding.  I'm so tired of getting rid of stuff and wading through stuff that I need to find a home for.  Not bad stuff, just don't have room for it!  Sigh.....

Anyway.....that is where we are now.  Next weekend will be pour more self-levelling compound.  Gutting the little bathroom leaving only the toilet.  More wall patching.  Tiling - finally!  I've got a few days off with the builders, so I hope to get a lot done.  Especially, since we got a call from the furniture place and our couch and chair will be ready this week.  They said they could wait a week......hmmm........


Wednesday, February 11, 2015

The Wall of Damp Doom

As you can tell I'm enjoying coming up with the titles for these posts!

So we called in Heber Crawford the builder and he recommended pointing the outside of the wall, as we do have crumbling mortar between the bricks.  But the big thing was to keep the damp from coming through to the inside wall and stay on the outside so that it can evaporate that directions.  He wanted to take off the plaster from the wall a meter down to the floor all the way to the inside brick work.  Then he would clad it with a damp proof membrane and put back on a thick coat of plaster.

We also asked him to fill in a doorway we had that was redundant.  In a small house like ours, you just have to have as much wall space as possible.  We had furniture in front of that door for years now, and it just seemed stupid.  I'm sure that when the house was built in the 70s, you didn't want people walking into your kitchen but we don't mind now.  So the door is now gone!  That one took a bit of talking about with hubby.  He wasn't sure, but I told him that we can't put the book cases back on the outside wall as we need to watch the condensation this can cause.  So the book cases need to go on the wall with the door and it looks silly to have a door behind furniture.  I think he was just being his cautious self, which is another way we balance each other out.

We had a problem though.  Heber and George started to work on the walls and did a damp course just to make sure it was OK.  This was an injection method.  Heber called us in and told us he was worried about the old plaster.  The original builders had used something that turns into dust when you manipulate it.  We have been battling this for a while, as we have a hard time hanging heavy shelves and stuff due to the poor quality of the wall.  He was afraid that it would cause so much dust that it wouldn't be healthy for them but especially me.  So we decided that it would be better to put the damp proof membrane on the wall with out digging into it and he would then plaster over that.  They did a good job and left us with the painting and filling in of the last few holes etc on the other wall.  The outside didn't get done because we kept having rain.  So we will have to get him out again later in the year.

 Rich spent his time taking the wallpaper off and I took off the radiators.

This is where some of the fun stuff comes in.  I've picked new radiators as I wanted to have them on the walls with the windows and have tall thin ones.  Rich advised me on the BTU's we needed so that we have the right amount of heat still and I picked these beauties:

https://www.pinterest.com/pin/172966441914465704/

https://www.pinterest.com/pin/172966441914465700/

We had a bit of trouble with delivery as they used a company that hasn't come into the 21st century and can take the time to let you know when in the day they will be delivering.  But they are now in our garage waiting to be put on the wall.  I LOVE plumbing, so I'm looking forward to that!

Well, now back downstairs to do more spray painting.........

Sunday, February 08, 2015

DIY - The Living Room Years

Ok, so I hope it doesn't take a whole year....or years....

Rich and I have been married for 12 yrs and some now and all this time I've been sort of living in the house as it was when I moved in.  With me being sick we have only managed to really do up 3 rooms.  Our bedroom is the same, except I took down the curtains, from the people who lived here before.  The carpets are falling apart.....well I could go on.  I've felt a bit overwhelmed and my depression doesn't help this.  Plus, I know that Rich and I sometimes get on each others nerves when we have done the few projects we have done, and if you know me at all you know that last thing I want to do is fight with my husband.

But this year I've bitten the bullet and decided that we have been married long enough to withstand a full remodelling of the whole downstairs.  Rich is keen, especially as we found out we had mould on our living room wall caused by damp coming in for the outside wall  (we are an end-terrace house).  I've started having asthma problems for the last couple years and this was causing some of the problem.

I'm the project manager on this, as I'm the one that has both the practical bent in our relationship and the interior design ideas.  Rich is the patient one that can spend hours sanding down until totally smooth and paints so well I can't even try to compete.  So we are actually I pretty good team as long as we are patient with each other.  I started contacting companies to come and give us some advice on the wall.  After two came in and gave me conflicting ideas I was stressing.  I was sure the second one was fobbing me off a bit.  I just felt like he wasn't taking it seriously.  Then I remembered that I had  bought a book a few years ago called "The Damp House" by Jonathan Hetreed.  Yes, I bought a book about DIY......anyway.  I read this book cover to cover and learned so much about houses in the UK that I never thought about.  I learned the following important things:

  • Brick is not waterproof
  • Houses need to breath
  • Condensation (which is always on our windows and the mould that goes with it) is caused because we don't let our houses breath.
  • Cavity wall insulation isn't as great as you think....and causes a lot of the condensation and damp problems we have.
  • What a damp course is...and why ours was fine and not the problem as the first builder said.
  • Why our problem wasn't condensation on the particular wall, but penetrating damp where either builders rubble or holes in our insulation are causing the dampness.
  • Walls can hold damp for a long time and the damp problems we are having after a fairly dry summer were mostly likely caused by the wet spring.
Well, this meant that I needed to call in a different builder and this one took in that I knew what I was talking about and we came to an agreement on what needed to be done.  His team did a great job and he has helped us make decisions about other stuff we need to do, like problems with the floor etc.  

I'll stop this post now so it isn't too long and will post more about how things are going in a day or so.  

Here is a pic of me just to make you laugh.......The DIY QUEEN on her throne.

Wednesday, May 01, 2013

Gemini

A finished project! Yeah! I like making T-shirts since England doesn't get that overly hot like Illinois can. This is my second, but first in cotton. Last year I used linen, which was lovely, but when you knit something with out seams joining the ends is hard. Linen and cotton aren't as forgiving as wool. I ended up with a huge hole when I joined the linen on the sleeve. Well, I decided to ask someone who had designed t-shirts how they joined theirs, and she said with a really tight knot and the cut off the ends. Hmmm Well I gave it a go with mixed results. I love the Cascade Ultra Prima yarn though. It is sooo soft. I have enough leftover for a child's sweater.....so which of my "adopted" nieces of 4 and under to choose......

Oh the pattern is from Knitty.com and is called Gemini.

Tuesday, April 23, 2013

Pincushion done.

Hello

Seems I have to be careful how many pictures I try to download. So I've had to edit this post a bit.

I've been suffering from my IBS really bad last few days. We went out to eat and had spicy Jamaican food and I've been off work, so I've been finishing off the embroidered pin cushion. (See rest of pictures.) This has been so much fun! I not only enjoyed the stitching, but the sewing up was magical. I didn't really know how it would get it's shape but it automatically does it as you sew it. Very cool. I used left overs from spinning to fill it up. Lots of crappy spinning from first few weeks have been useful!

Hopefully I'll feel better this weekend,and can post about some sewing.....


Monday, April 01, 2013

Welcome back

Wow can't believe it has been 3 years. Amazing really that Blooger hasn't closed me down.

Well I've decided to give it another go on my iphone. My pictures aren't going to be great and I'm not going to spend hrs on it, but I will try to post what I'm doing so that I can keep better track of what I'm up too. As many of you might experience, I feel I don't get anything done....when actually I've been very busy! So this will be a bit o of this and that.

Recently I went to the Knitting and Stitching show at Olympia and picked a several new embroidery projects. This is one I picked up from Sue Hawkins Needleworks. She has a lot of very traditional kits for pincushions and scissor keepers along with some interesting accessories to buy. I like the spring colors of this and have been beavering away at the stitching.


Saturday, October 02, 2010

Finally Some crafting

Here we are...finally getting to sit in my beautiful craft room and remind myself that I am a crafter...not just a knitter and crocheter but a crafter!!!!
I just found out the other day that Bloglines is closing down, which gutted me because I have been with them for years and really liked how simple their feed reader was.....but the point is...I had a lot of patterns clipped on there and had to go through them and do something else! Well I came across this pattern from the blogger Knick Knack and Rick Rack which I have been holding on to since 2008.
It is a testament to buying things that you don't know what you are going to do with them...because I've had this rick rack for a couple of year, the felt is bits I had left over from other projects....see that is why you have stash!!! Tell my hubby that next time you see him!!!!

Anyway, the only thing different I did to her was I put card inside the two circles of felt. I decided that I need the strength because the rick rack is the large type and was very stiff. The thin rick rack was to small for this project. I bought this stuff on a trip to London, so there are lots of memories for me!

Well, this is the start of a beautiful relationship with my new room. It isn't totally finished yet. I've got some more organizing and decorating. Though that is true, I found it so good to be able to find things easier!! Looking forward to having some friends over to do some craft fun soon!!!